How To Do Fishbone Stitch
- Sara | Pixels & Purls

- Aug 19, 2020
- 2 min read
Updated: Sep 24, 2020
Fishbone stitch is a nifty lil embroidery stitch! It's relatively simple and creates cute leaves. It can also be used as a fill stitch to colour in areas of your pattern if you want a diagonal look going on. Here's how to do it!
1. Bring your needle up at point A and down at point B, creating one long stitch. I aim for the length to be about one third of the area I am filling, but you can play around with the length to create different results.
2. Bring your needle up at Point C (just to the right of and below Point A), and then down at Point D (to the left of and below Point B). It's important to cross over slightly and insert your needle just past the middle line.
3. The last image in this row shows the result of step 2. You can do this a little nearer to Point A, but I wanted the photo to be clear.
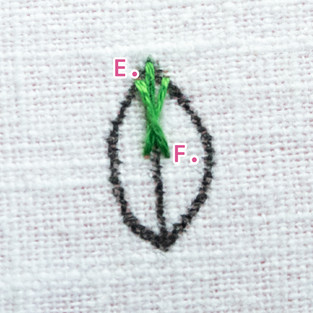
4. Repeat this from the other side. Bring needle up at Point E (just to the left of and below Point A). Insert your needle at point F, (just below Point B) and pull through to the back.
5. Continue in this fashion. Bring your needle up at Point G (just next to and below Point C) and down at Point H (just to the left of and below Point D), again ensuring your crossover slightly.
6. Bring your needle up at Point I and down at Point J, still crossing over slightly.
7. Keep going until the shape is filled, and in case I wasn't clear, keep making sure your stitches are crossing over slightly in the middle!
8. As the shape curves, adjust the length of your stitch, starting along the outline each time. You may have to do some small stitches at the bottom to create a curve and fill gaps, that's fine - whatever works!
9. Finished. Ta-da!


Comments