How to do Turkey Work / Turkey stitch - hand embroidery tutorial
- Sara | Pixels & Purls

- Oct 9, 2023
- 2 min read
Turkey work is a great way to add some dimension to your embroidery - it's great for adding fluffy clouds, pom poms and 3D flowers to your work. I've used it here for the broom in my Halloween Cats embroidery design.


1. Start without a knot in your thread. I'm using three strands of thread here but experiment with the amount you use - more strands will make a chunkier, fluffier effect.
2. Working from the front of your work to the back (yes, opposite to normal!), insert your thread at the bottom left of where you want your row to start and leave a tail that is long enough to be trimmed at the end - so longer than the final result you want.


3. Come up to the left of your stitch a few millimetres away from the bottom, then cross over to the right and go back down. This stitch is to pin down the tail.


4. Come back up in the same hole as the start of your tail (at the bottom) and then move over a few millimetres to the right and go back down, leaving a loop that is similar in length to your first tail.


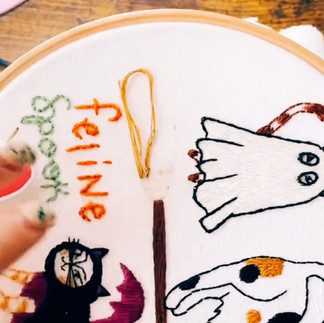
5. Come up to the left of the right-hand side of this loop, a few millimetres away from the bottom, then cross over to the right and go back down. This stitch is to pin down the loop.
Repeat steps 3-5 until you have filled up the row.
6. This broom is worked in two rows to add extra thickness - this is optional if you're using turkey work for something else! You can do as many or as few rows as you fancy. If you're working on the broom, repeat steps 1-5 until you've filled up a second row. It's easier to work the bottom layer first, which is why we've started a bit up from the bottom. The second row should start below the first row - so towards the broom handle.


7. Now it's time to trim! Where you trim changes the effect - you can trim the strands really short to create a fluffier effect or leave them longer for something like this broom or if you're using Turkey Work to add human hair for example - have a play around! But all you need to do is grab some sharp embroidery scissors and cut along where you want your strands to end. And that's it!


8. For this broom, I then added 2-3 long horizontal stitches over the top to pin the strands down and make it look more broom-y.
Let me know how you get on!


Comments